Friday, December 19, 2008

Parent Albums...in time for the Holidays!

A week or so ago I told you I finally broke down and decided to make my own wedding albums -- for my parents, my in-laws and for us. Well -- the parent and in-law albums are done just in time for Christmas!!


You asked to see the finished project and I'm so excited to share it with you. I was surprised at how easy it was once I got started. The most time consuming part was choosing the images. I placed a large order from mpix.com. They arrived quickly and the quality was great. This is the second time I've ordered from them and both times I was very happy with the product.

I picked Kodak e-surface paper (no additional cost) which has a nice matte finish, crisp images with spot on color. I loved that they had the option for many large and odd shape prints. We ordered a few large/square images that really make each album special (make sure they will fit in your album before you order).

I bought the albums at Kate's Paperie in NYC but they are available on-line here if you're interested. I planned to use clear and kraft corners but couldn't find them in stores and didn't have time to wait for an on-line order to arrive. I happened to have blue photo corners that I used for my in-law's album and I bought black corners from Kolo (also at Kate's Paperie) for my parent's album.


So without further ado, here are the finished albums. First up (with the blue corners) is for my in-laws:


I had some brown ribbon left over from the wedding that I used to tie the smaller album to hold it closed.


The pages are interleaved with glassine to protect photo surfaces.


These two are examples of 5 x 5 inch square prints.


Second up (with the black corners) is for my parents:


On the inside front cover I included a wedding invitation and reception card.


Here is another large odd shaped photo -- 6 x 9 inches.


The pages are of this album is also interleaved with glassine to protect photo surfaces.


Another square - this one is 8 x 8 inches.


A detail shot of the spine.


The rest of the images used in both albums are 4 x 6.


Here is the last page of the album. Here you see a different layout I picked to keep it interesting.

Some tips:
1) Lay out all your images in the album before you secure any of them to the page. This way you'll be sure they all fit and are in the order you want.
2) I used two different photo corners -- lick and stick (like an old stamp) and self-adhesive which you just peel and stick. The self-adhesive made the process go a bit faster, but I would use either again.
3) To place photos put two corners on opposite corners, place, push down, then place the other two corners. This way you'll be sure to place the photo where you want it.

There are many options to make your own album...Blurb, Mpix, Snapfish, Shutterfly. The list goes on and on. But I really wanted to have prints in an album, not a magazine style book. Mr. Onion and I plan to make our own album (a 12 x 12.25 inch version of the ones I used for our parents) AND a blurb book to include vows and special memories and details of the day.

I hope this inspires the 73% of you married ladies who haven't made an album yet! For those of you who have made your own album, what kind of album did you make? Any tips for those who are intimidated to start such a daunting project!

Sunday, December 7, 2008

Photo Albums

Almost nine months ago I posted about procrastinating making a wedding album. There are a million excuses, but the bottom line now is that $1000+ for a professional album just isn't in the budget. We just got our hi-res photos from our photographers in October and with Christmas fast approaching I decided to use that deadline as motivation to get me started. Over the weekend Mr. Onion and I headed to Kate's Paperie and bought one of each of these beautiful albums. I really love them. One for my mother-in-law, one for my mother and the large one for our album. I was hoping to find brown photo corners on-line (what can't you get on-line these days?) but I've met with defeat. I decided to settle on a combination of Kraft colored corners and clear corners (per Miss Hot Cocoa's recommendation).

I spent hours (and I mean hours) over the weekend uploading about 350 hi-resolution images to MPix.com where I ordered Mr. Onion's wedding gift from last summer. The quality of the book was great so I trust the quality of the prints will be fantastic. They were a little pricey ($.29 per 4x6 print) but for albums I hope we'll all have for years to come, I decided not to cut corners on the photos.

Cost break down:

Albums:
Small (6.25" x 7.5") = $45
Medium (10.5" square) = $105
Large (12" x 12.25") = $132

Prints:
Approximately 400 = $155.07
Shipping = $5.95
Total = $161.02

Supplies:
Kolo Photo Corners: 5 boxes of 240 corners = approximately $36
Kolo Photo Tape: 1 roll = $8

Grand total for 3 albums = $487.02

If anyone has suggestions for photo corners (know where I can get brown corners other than the beautiful and expensive Martha Stewart satin), or photo tape, or any tips on making your own album look great and hold up to years of page turns...please share! I'm nervous about this project.

Friday, December 5, 2008

Holiday Sales - UPDATE

So if you saw my last post and thought -- "I have to try that amazing shave cream from Bliss -- I want to be the softest thing ever!," you're in luck. I just saw, on my dailycandy.com email, that they are offering 20% off their treatments and Bliss products. Treat yourself to a massage or facial while you're at it!


Deal: Take 20 percent off massages, facials, body treatments, and products in-spa and online (enter code DCANDY or mention us when you pay).
When: Thru Dec. 31. Treatment discount valid Mon.-Wed.
Where: 541 Lexington Ave., at 49th St.; 12 W. 57th St., b/t Fifth & Sixth Aves.; 568 Broadway, b/t Houston & Prince Sts.; online at blissworld.com. Appointments at 212-219-8970.

I wish I'd seen this before I bought shave cream for all my girls! Do comment if you take advantage -- I'll feel better :)

Tuesday, December 2, 2008

My favorite holiday sales!

I wanted to share some of my favorite holiday sales and gift ideas. Holiday sales are a great time to pick up bridal party gifts! First up, Dasha Boutique, where I purchased beautiful pearl earrings as a gift for my bridesmaids.


2) Oliviers and Co., a fantastic source for olive oil, vinegar and foodie gifts. Their items make great gifts for parents/in-laws or for the wedding party member who loves to cook! My favorite item? Their lemon specialty oil and balsamic vinegar.

3) Bliss Spa's thermal shaving cream. This is made for men, but it's one of my new favorite things (I feel like Oprah)! Seriously the best shave you'll ever have. Get one for yourself, your bridesmaids, your fiance/husband (I did)....you'll all be wonderfully soft! And use coupon code, WELCOME11, for FREE SHIPPING with $50 purchase & FREE GIFT (six pack). EXPIRES DEC 31, 2008.

4) Fresh Sugar Lip Treatment

This is a splurge at over $20, but it is one of my favorite things! It's $22.50 at Fresh, but I found it online at LipstickUSA.com for $20.50. This is a great gift. And if you have a little more to spend, the Brown Sugar Body Scrub is to die for!
Usually $65, I found it for $58.50.

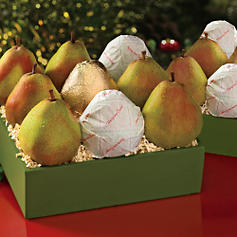
5) Harry & David: My favorite is their Royal Riviera Pears -- buy one box, get the 2nd box 50% off! Seriously sooooo delicious! I send these to my parents every holiday season.


I hope this gives you some holiday or wedding party gift ideas and saves you a few dollars in this difficult economy. Happy Shopping!

Monday, November 10, 2008

Age to Marry...Sooner or Later?

I was taking a break today to read the news, and what do you know, there was an article about what age to marry. In 1890 the average age to marry for men was 26 and for women 22. The average age to marry dropped significantly in the 1960's and is now the highest since the census began in the late 1800's.


source

Personally I felt on the younger side -- I was 26 and Mr. Onion was 27 when we were married last September. But according to the census, this is exactly the average ago for 2007. I was the first of my friends to marry, so that also added to my perception of "average." I think a lot of your perception of the best age to marry has to do with where you live and of course your circumstances. Many couples wait until they are finished with degrees (undergraduate or graduate) while some just don't find "the one" until later in life. There is so much societal pressure for so many women to get married by a certain age. People have strong opinions -- "Oh you're too young to get married," or "What are you waiting for? You're not getting any younger!"

Also, your "plan" changes along the way. If you'd asked me when I was in college when I thought I'd get married I would have said my early 30's. But then I fell in love and suddenly the time line I had in mind didn't matter anymore.

Do you think, like John Van Epp suggests in the article, that we are so confident now in fertility treatments to take care of us that we wait longer to marry and have a family? What age do you think is ideal for women and men to marry and why?

Saturday, October 4, 2008

Quick weeknight meals

Most newly engaged or married couples have very busy schedules. Between work, family, social obligations and spending time with each other, you don't always have time to make a complicated meal on a week night. It doesn't mean it can't be easy and delicious!

Eating too later = cranky AND a migraine for Mrs. Onion. I try to avoid this at all costs. I thought I'd share a few of my quick and easy go-to recipes for weeknight meals.

1) Linguine Fini with Pesto, Olives and Feta CheeseIngredients:
Pesto (costco sells a very yummy pesto)
Feta cheese
Calamata olives.

Preparation:
Boil water and cook pasta. Pit olives and cut up feta, put aside. Drain pasta and toss with pesto and feta. This is so easy and yummy especially when you're in the mood for salt.

2) Vegetable baked penne (or ziti).

Ingredients:
1 lb box penne
2 zucchinis
1 medium onion
1 cup red sauce (approximately)
1 cup ricotta (approximately)
½ ball of fresh mozzarella
Pinch of salt
Dash of red pepper flake (to taste)
Dash of Oregano

Boil water and cook pasta. While penne is cooking chop zucchini and onions. Sauté onions first, then add zucchini. Under cook the zucchini a bit as it will continue to cook while baking in the oven. Then mix in a medium bowl red sauce, ricotta, salt, red pepper flakes and some oregano. Put aside. Then, cut up fresh mozzarella in 1-inch chunks.

Once the pasta is cooked (again slightly under cook as it will continue to cook in the oven), place in baking dish. Pour red sauce/ricotta mixture over the pasta and mix it up. Then pour veggies in and mix again. Finally place chunks of cut up mozzarella in dish and mix one last time so everything is evenly distributed. Bake for 20-30 minutes at 350 and enjoy!!

3) Quinoa with Black Beans and Cilantro (a new find from the September issue of Bon Appetit magazine).
4 to 6 servings
prep: 25 MINUTES TOTAL: 40 MINUTES

1 tablespoon vegetable oil
2 cups chopped white onions
1 cup chopped red bell pepper
1 cup quinoa,* rinsed, drained
2 teaspoons chili powder
1/2 teaspoon ground cumin
1/2 teaspoon salt
1 1/2 cup water
1 15-ounce can black beans, rinsed, drained
1/2 cup chopped fresh cilantro, divided
Crumbled feta cheese

Preparation:
Heat oil in heavy medium saucepan over medium-high heat. Add onions and red pepper; sauté until beginning to soften, about 5 minutes. Stir in next 4 ingredients. Add water; bring to boil. Cover, reduce heat to medium-low, and simmer until quinoa is almost tender, about 14 minutes. Add beans and 1/4 cup cilantro; cook uncovered until heated through and liquid is fully absorbed, about 3 minutes. Transfer to bowl; sprinkle with ¼ cup cilantro and cheese, if desired.

What are some of your favorite quick recipes?! Please share them with the hive :)

Monday, September 8, 2008

Mmmm...year old cake!

Mr. Onion and I joined the ranks of newlyweds to save the top of their wedding cake to enjoy a year later and I have to admit...it tasted pretty darn good (more on the cake later)!

Cake made by Alison at Mirabelle's Cafe in Burlington, VT.

Mr. Onion and I celebrated our one year wedding anniversary by heading back to Burlington, VT where we were married last September. We stayed at the Willard Street Inn where it all began and enjoyed the weather and being outdoors in such a beautiful part of the county.


Here we are on the steps at the inn on our wedding day.


And here we are on the steps this past weekend. We asked a very kind guest at the inn if she'd mind taking our picture explaining our story and connection with the inn. She told us she and her husband had been married for almost 60 years and assured us that our love would continue to grow!


Our room was lovely and very romantic. It was a bit of a splurge, but we didn't get each other gifts -- the trip was our shared gift!


The breakfast at the Willard Street Inn is a major highlight! Not only is it delicious (they have a chef who comes in every morning just to make three yummy breakfast choices -- usually an egg dish, and a sweeter dish (pancakes/french toast) and a granola and yogurt for a lighter breakfast), but their breakfast room is stunning!


You might remember Mr. Onion and I had our "first sight" here on our wedding day.


The owners are wonderful gardeners and grow these amazing dahlias that make you feel welcome at the guest book table....


More dahlias at reception and on the breakfast tables. I thought this was a lovely idea for wedding reception or cocktail table decorations. This is such an easy DIY flower project and something that can be done in advance.


Then we headed to town and Mr. Onion came across a brick on the market place that was so sweet....what a way to propose! I wish I knew the story of the couple.


That night we had a romantic celebration dinner at Leunig's -- the best restaurant in town! When our waitress approached our table she smiled and said "You guys got married at Adrianas last year. I served your party and it was an amazing wedding!" Burlington is such a small town and I was pleased to see a familiar face.


The next morning we got up early to enjoy the day. We drove out to the Grand Isle, a small island in Lake Champlain that is quite close to Burlington.


Then we headed back to the Lake Champlain waterfront in Burlington where we took our engagement photos.


On the waterfront is Splash Cafe where a wedding reception was going to be held that evening -- we saw many well dressed guests on their way, but sadly, no bride and groom sightings!


The weather really turned out to be lovely...a little chilly, but sunny!


And we made a friend! He was fearless and came right up to us hoping we had bread for him.


At the end of the day we headed back to the inn to try our wedding cake and see how freezing for a year would work. MIL Onion did a fantastic job. If you plan to freeze the top of your wedding cake, here are some tips.

1) Know the size of the top layer and get a Tupperware a little bigger (round/square) depending on the shape of the cake.

2) Talk to your reception staff beforehand to let them know you plan to do this so they don't serve the top of the cake.

3) To preserve the cake put in the fridge so it sets up a bit (this way it won't get too squished), then wrap in plastic wrap, (two layers), then tinfoil (two layers), THEN place in Tupperware.


4) Bring a cooler or freezer bag to store it in and transport home.

5) Prepare your freezer (or friend/parent/in-law freezer) before hand so you know the Tupperware will fit and you can keep it frozen for a year.


And enjoy, but don't eat the whole cake!! We brought the rest home to share with our families.

We had a fantastic time and enjoyed remembering our wonderful wedding day. But the best part was to reflect on our first year of marriage and to spend a whole weekend of down-time with each other...no cell phones, no work emails...just us! We both feel so fortunate everyday and are sure to tell each other as often as we can. I look forward to all our future adventures...including closing on our first home (more on that later). Did you tell your partner you loved them today?! Don't forget...it never gets old :)

PS. A very happy anniversary to my date twins -- Mr. & Mrs. Corn and Mr. & Mrs. Emerald!!